

Everything You Need to Know about ASP.NET Web Forms
In my last blog, I covered NuGet: an extension of Visual Studio that helps you integrate famous libraries and packages into your application. As I mentioned in that blog, I will be using NuGet from time to time throughout this blog series, so I went ahead and got it out of the way early. Now that you all know how to use that tool (if you don’t and haven’t read my previous blog, click here), I can start with the major technologies that are dominating the ASP.NET framework, helping us to build far better web applications than ever before.
In this blog I will be presenting to you the heart and soul of ASP.NET Technology. That’s right! The ASP.NET Web Forms that started it all. I remember starting ASP.NET 1.1 back in my university days. Ah, the golden days!
In this post you will find a brief introduction on ASP.NET Web Forms along with some details on how it works. We will then move on to practical implementation using the latest ASP.NET 4.5 Web Forms. The sections are clearly labelled (I hope) so you can find exactly what you need.
So without further ado ladies and gentlemen, ASP.NET Web Forms!
ASP.NET Web Forms
ASP.NET is an ever-growing technology for Web application development using the .NET Framework. It takes the best from its predecessor, Active Server Pages (ASP), as well as the rich services and features provided by the Common Language Runtime (CLR) then adds many new features. The result is a robust, scalable, and fast Web development experience that will give you incredible flexibility so you can develop web-based applications with ease.
What is ASP.NET Web Forms?
ASP.NET Web Forms is one of the three programming models for creating ASP.NET web sites and web applications using ASP.NET Technology with the .NET Framework. The other two programming models are ASP.NET Web Pages and ASP.NET MVC (Model-View-Controller), which I will be explaining in my coming blogs.
Web Forms is the oldest ASP.NET programming model. Web Forms are pages that are requested by end users using their browsers. These pages are written using a combination of HTML, server controls, and server code. The requested page is compiled and executed on the server and the response back is in the form of elements integrated in a neat structure with information that gives your Web applications their look and feel. This is known as a user interface (UI).
Visual Studio 2012 provides an incredibly powerful Integrated Development Environment (IDE) for you to create ASP.NET Web Forms. For example, it lets you drag and drop server controls to lay out your Web Forms page. You can then easily set properties, methods, and events for controls or for the page in order to define its behavior, look and feel, and so on. Now that we know what it is, let’s examine the different components that make up this awesome web development technology.
How does it work?
The Web Forms page is composed of 2 components:
1. Aspx: Defines the visual aspect of the web page or UI.The code-behind file- 2. Defines the behavior of the web page and controls used in it.
The aspx file usually contains HTML code along with some great Web Form server side controls that are pre-built and registered in Visual Studio that you can drag and drop onto the page. The HTML code and Web Form controls are stacked on the page in a neat structure that will become the final visual output of our web page. Client side code like JavaScript and Ajax controls/code can also be put into this file to help define client side behavior (like validations, etc. that don’t require a round trip to the server).
The code-behind file, sometimes known as the class file, helps define the behavior that the page will have through server-side processed code based on page lifecycle events like page_load, page_init and webform control events available to you on the web page that you added to the visual aspx file, like an ASP Button Control Click event or a ASP Dropdown Control Selected event.
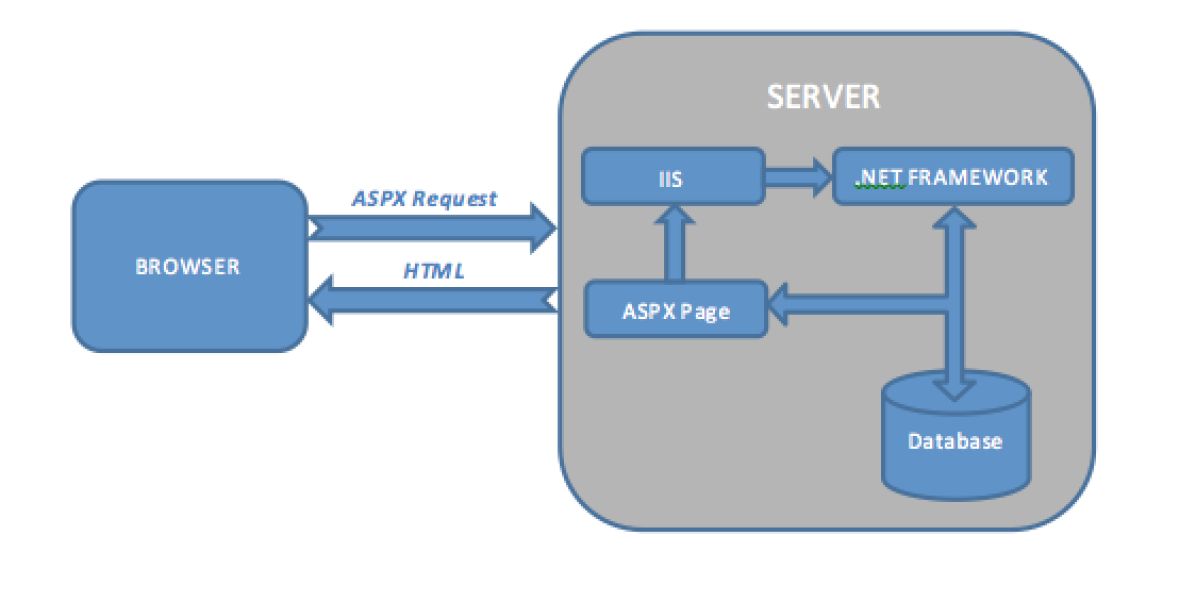
When a user requests a page using his or her browser, these components are compiled on the server using IIS and the .NET framework (which includes ASP.NET assemblies) installed on that server. Then the server, along with any requested data from the database (if any) that is needed, returns the generated html output of the page as a response that is rendered by the browser along with the defined behavior it has on certain user interactions one can do on the page. An interaction on the page is when the code-behind file sends another request to be processed, carries out the defined behavior, and renders the desired html output of the page (see the figure below for a graphical representation of this process). For example: let’s say we have a web page that displays all the zip codes in the United States and I choose the option of selecting a city using a dropdown to filter those zip codes. I would set the behavior of that dropdown in such a way that it takes a trip back to the server to give it the selected city I choose, filter the zip codes on that city, and then return the filtered zip codes back to the page to display.
How do you use it?
So now that you know how ASP.NET Web Forms works and how it can provide high quality web applications. I will now demonstrate by using a practical example of how to develop using this awesome web technology to fulfil your web-based needs.
IIS Services.
Visual Studio 2012.
SQL Server 2012.
(Note: Different versions of Visual Studio or SQL server can be used, but for this example the 2012 versions were used.)
You can also use a Visual Studio extension called NuGet to acquire/update certain assemblies for extended functionalities and features to add in. To learn about NuGet and how to install and use it you can visit my first blog of this series.
As I mentioned in the start of this blog series, readers will be best served if they are acquainted with basic knowledge of how to use .NET web development tools along with basic knowledge of SQL Server.
Okay now that you have everything you need to start development in ASP.NET Web Forms, let’s Rock n Roll Baby!
I will walk you through a demonstration of ASP.NET Web Forms using a simple site that lists the latest movies released and also provides ways to add, edit and delete listings to manage that list of movies.
Now we need to start by creating a project using the ASP.NET Web Forms Template. There are two types of projects to choose from when you are working with ASP.NET Web Forms: Web Application Projects and Web Site Projects. I know what you are thinking, why are there two different projects types if both are used to develop Web portals? Well there are many differences between them and they each offer different depending on the scenario. I won’t go into a lot of detail in this blog, but if you want more information on the differences between the two, Microsoft offers a great breakdown of then differences and when to use them:
http://msdn.microsoft.com/en-us/library/dd547590(v=vs.110).aspx
If you are not too familiar with these, it may be wise to take a moment and review them. I’ll go get some coffee and check the scores on my sports channel. We will meet back here in 5 minutes.
Welcome back! Now for my demonstration, I will be working with Web Application Projects. It is my preferred project type, and from what I have gathered in my research, the popular choice among Microsoft .NET guys going forward. Microsoft sums it up best in their recommendation, saying that “many developers who choose web site projects eventually find that the disadvantages outweigh any perceived advantages.” I have been one of those “many developers” before, so I typically stick with Web Application Projects.
Okay now, let’s stop the lecture and learn how to use this technology practically, shall we?
In your Visual Studio 2012:
Go to File -> New -> and click Projects…

From the templates on the left side, select Web and then select ASP.NET Web Forms Application from the list in the middle.
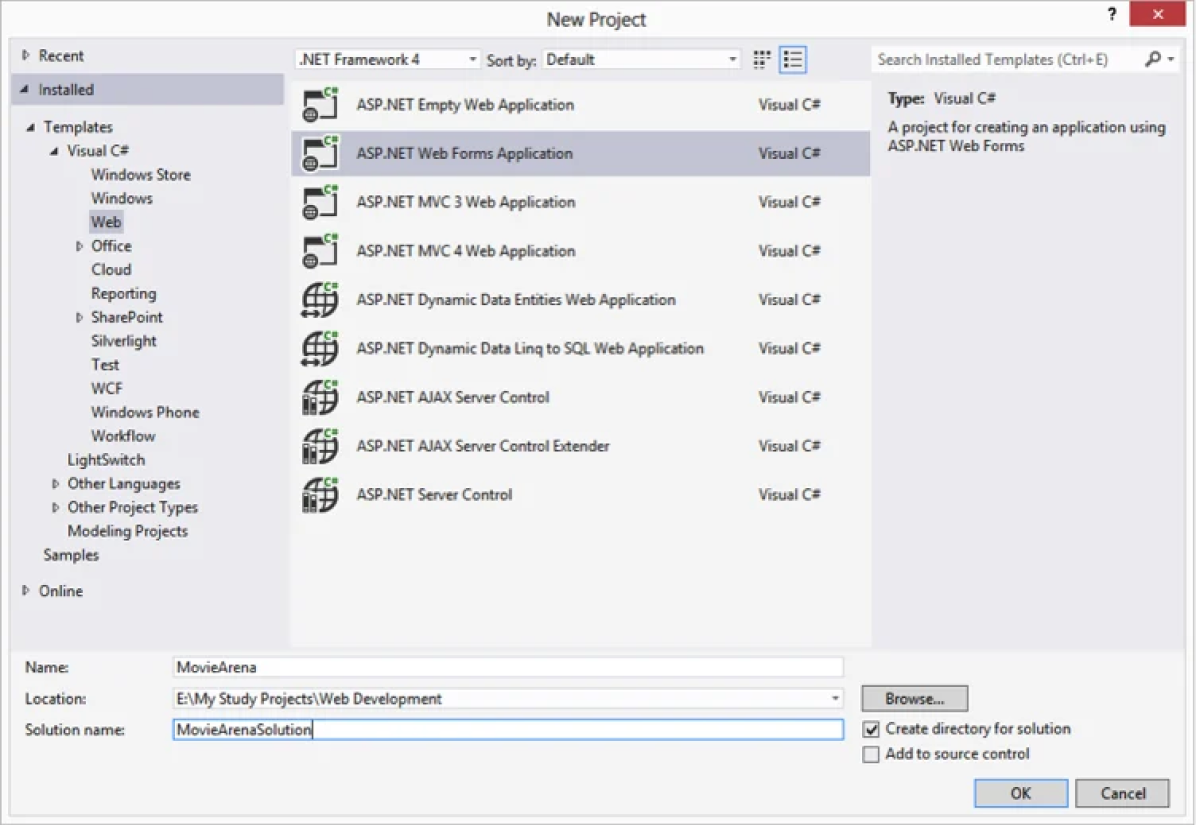
Rename the project to “MovieArena” and the solution name to “MovieArenaSolution” then click OK.
Okay, now that we have our web application created, let’s start building our app.
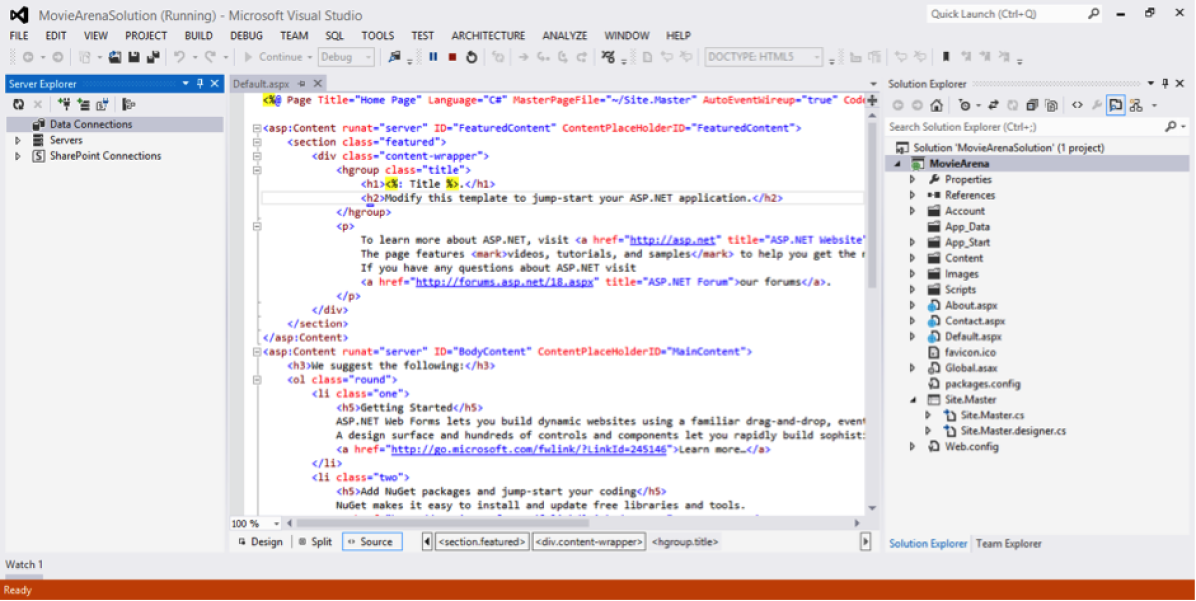
As you can see in the solution explorer on the right side, Visual Studio already inserted some default pages and functionalities in your web application and opened up the default.aspx designer code in front of you.

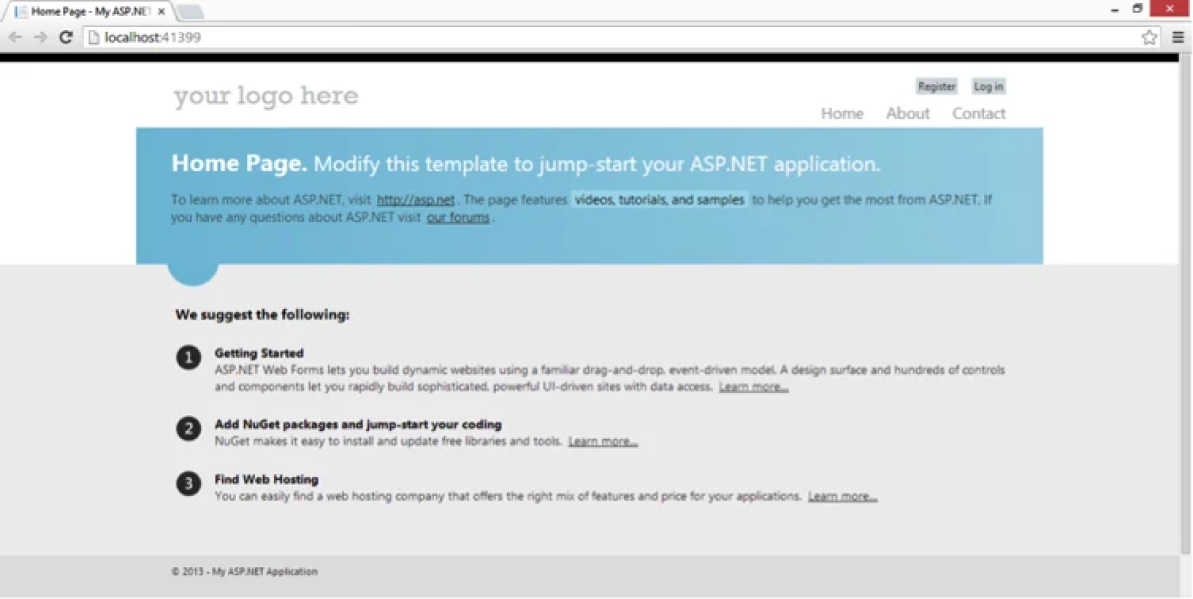
You can build the web application now and view its default look and pages that are already inserted by Visual Studio. This application gives you a basic idea of how an ASP.NET Web Forms application looks like in development. So right-click on the project name in the solution explorer and click the “Build” option from the menu. Once the build is done, click the “Play” icon appearing in the quick menu toolbar, located just below the main Visual Studio menu items (or alternatively you could hit “F5” as a shortcut to do the same). This will compile your whole web application and open its start page in the default browser using the local IIS server.
Note: I am just going to update jquery and some other libraries in my web application for future use if I need them while using the extension NuGet.
With that done, I have a working Web Forms application and now I can build my movie portal. But before we start building our web pages, I will need to build a database that will contain a movie table to hold my data. I will be using Visual Studio’s own Server Explorer for this to show you the advantages of the powerful IDE that Microsoft built for us engineers. Assuming you know the basics of working with SQL Server databases, I will move quickly through the creation of our database plus table.
In the Visual Studio View menu, select “Server Explorer.” You will find that a panel has opened up on the left side of your Visual Studio IDE.
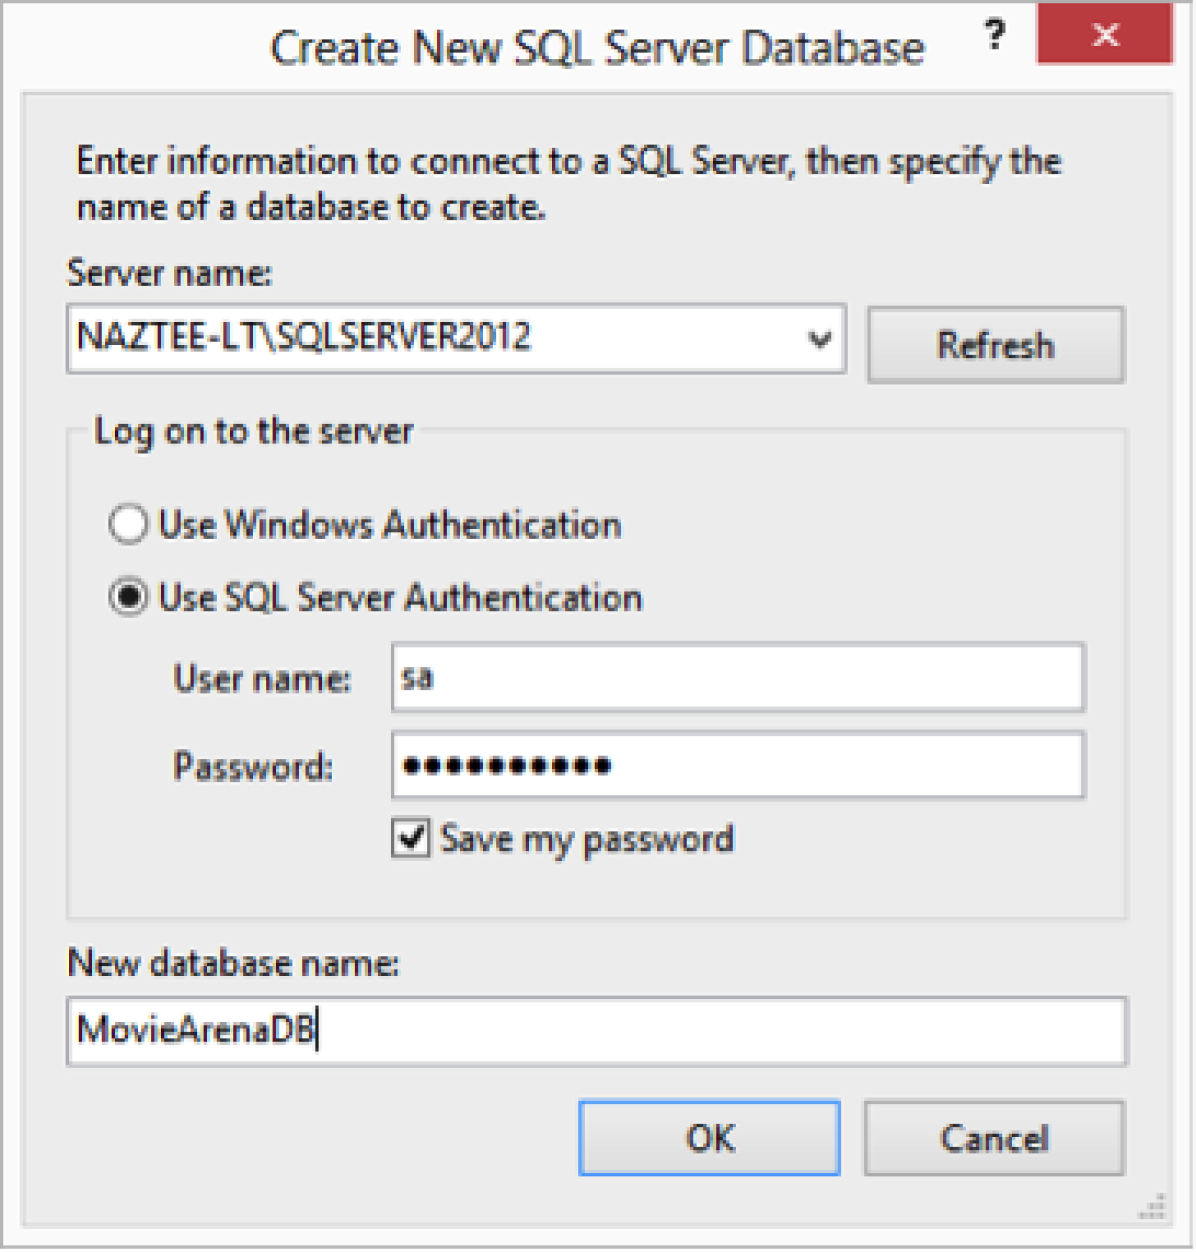
In the Server Explorer panel, right-click “Data Connections” and select the “Create New SQL Server Database” option. In the next popup window, enter your SQL Server instance info to connect to it (in my case it’s a SQL Server 2012 Instance) along with the database name, which I set to “MovieArenaDB.” Click “OK.”
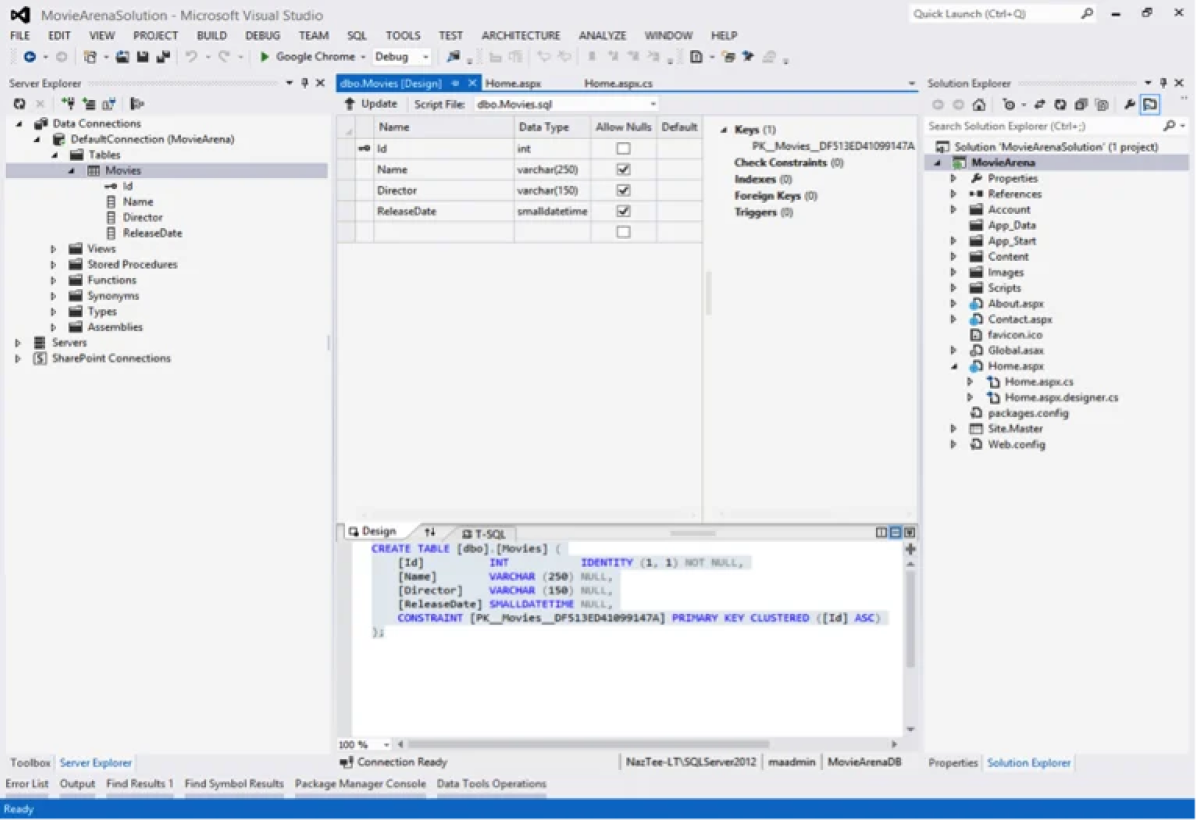
You will see in the Server Explorer that under the “Data Connections” node, you have a database connection with your new database. Expand it and right-click the “Tables” node and click the “Add New Table” option. The designer for new table will open in Visual Studio for you to add columns and set their types for storing the data you want along with their sizes. Keeping it simple enough, I added Id, Name, Director and ReleaseDate as 4 columns in my new table named as “Movies.” Then I hit the “Update” option on the top of the designer file, which compiled all of the database changes scripts to check for errors. After compilation, I hit “Update Database” in the next popup window to run the compiled scripts for the changes and additions in the database and create the Movies table in my database as described in the designer.
So now that we have our table to store data, let’s create five Stored Procedures to handle CRUD (Create, Read, Update and Delete) operations in our application. I hope that with this small demonstration and your great learning and researching ability, you now know how to handle the create/modify/delete etc. techniques of the Server Explorer to handle database changes and additions. So I will skip through these basic techniques/procedures that are solely related to the database.
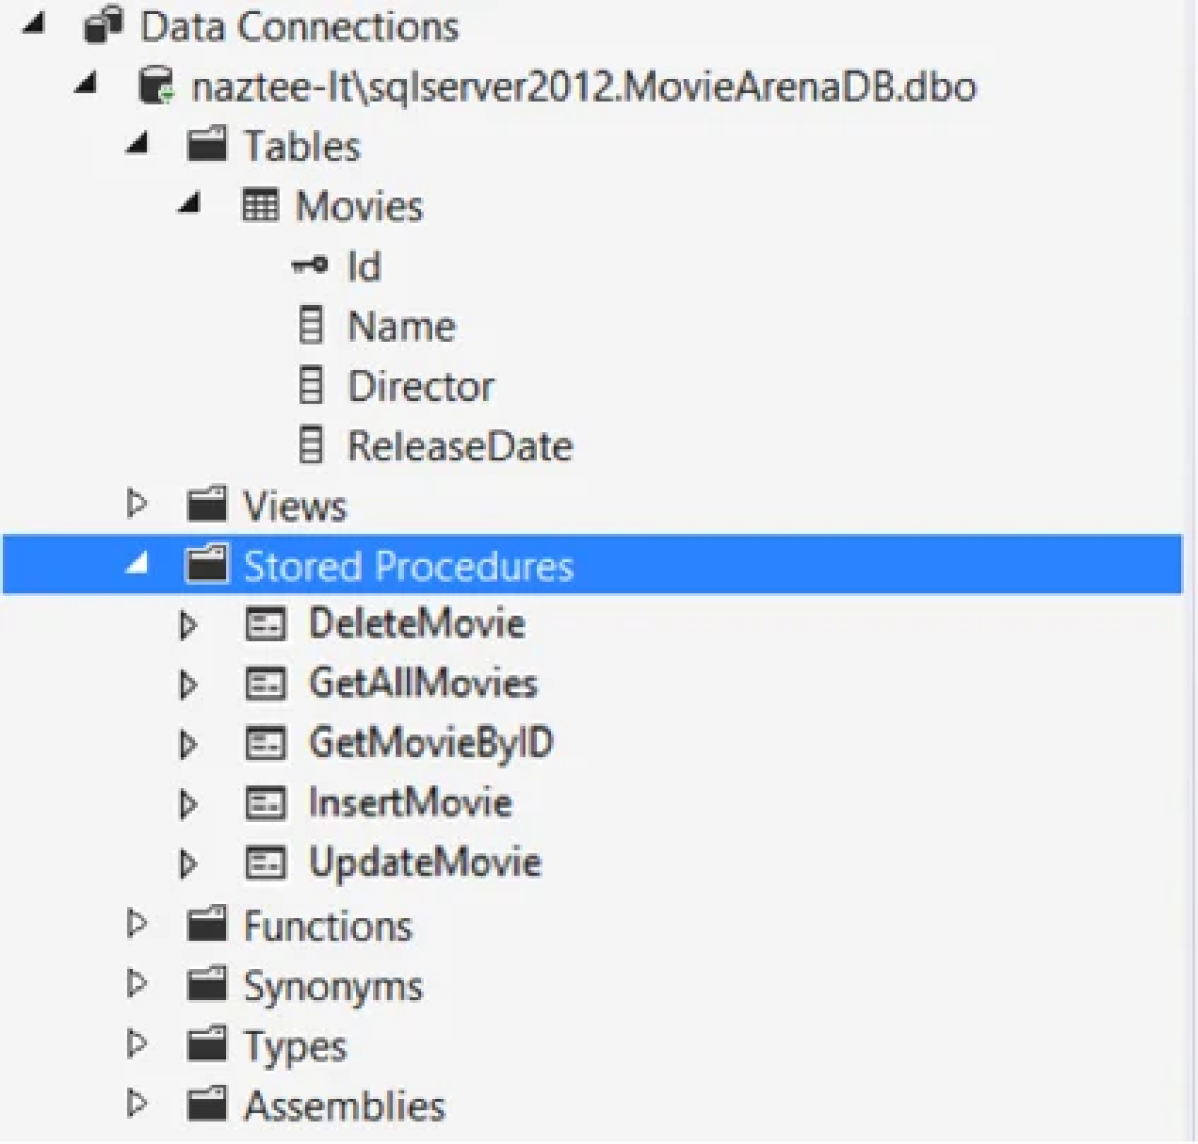
Okay! I have now created 5 Stored Procedures namely “GetAllMovies”, ”GetMovieByID”, “InsertMovie”, “DeleteMovie” and ”UpdateMovie” to help my web forms application retrieve or make changes/additions to my database as requested by the user using it. Some of them have parameters that are being passed to identify and carry info to be identified and/or inserted/updated.
With most of the database stuff out of the way, we will now start developing our Web Forms pages. Now we will add a Web Form page to display our movie listings by retrieving dates from the database. Also we will add the functionality in the same page that will allow an authenticated super user to add, edit and delete a movie.
Let’s start:
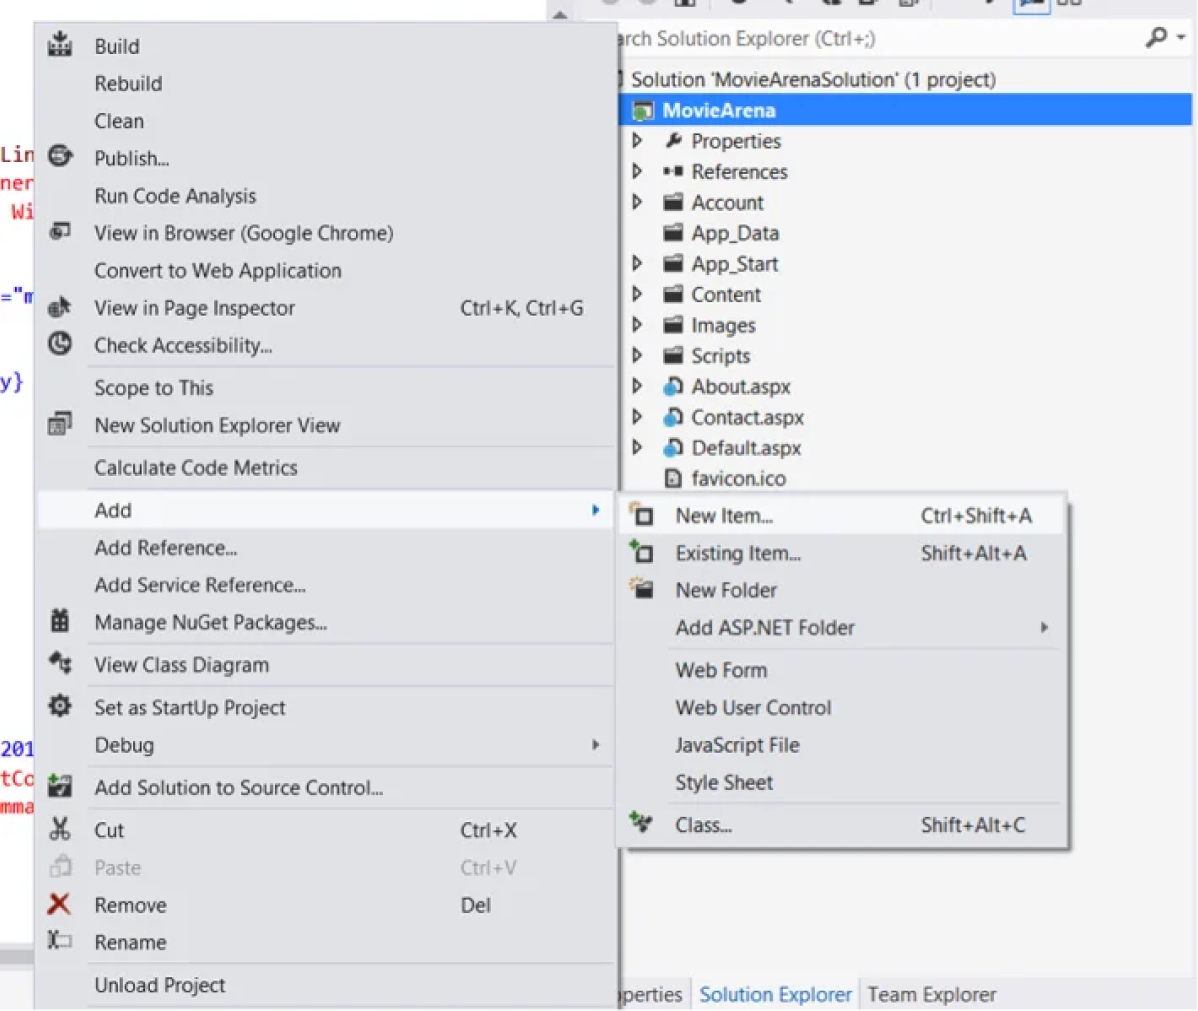
I will create our home page by right-clicking the root web application, hovering on “Add” and then selecting “New Item” from the sub menu displayed.
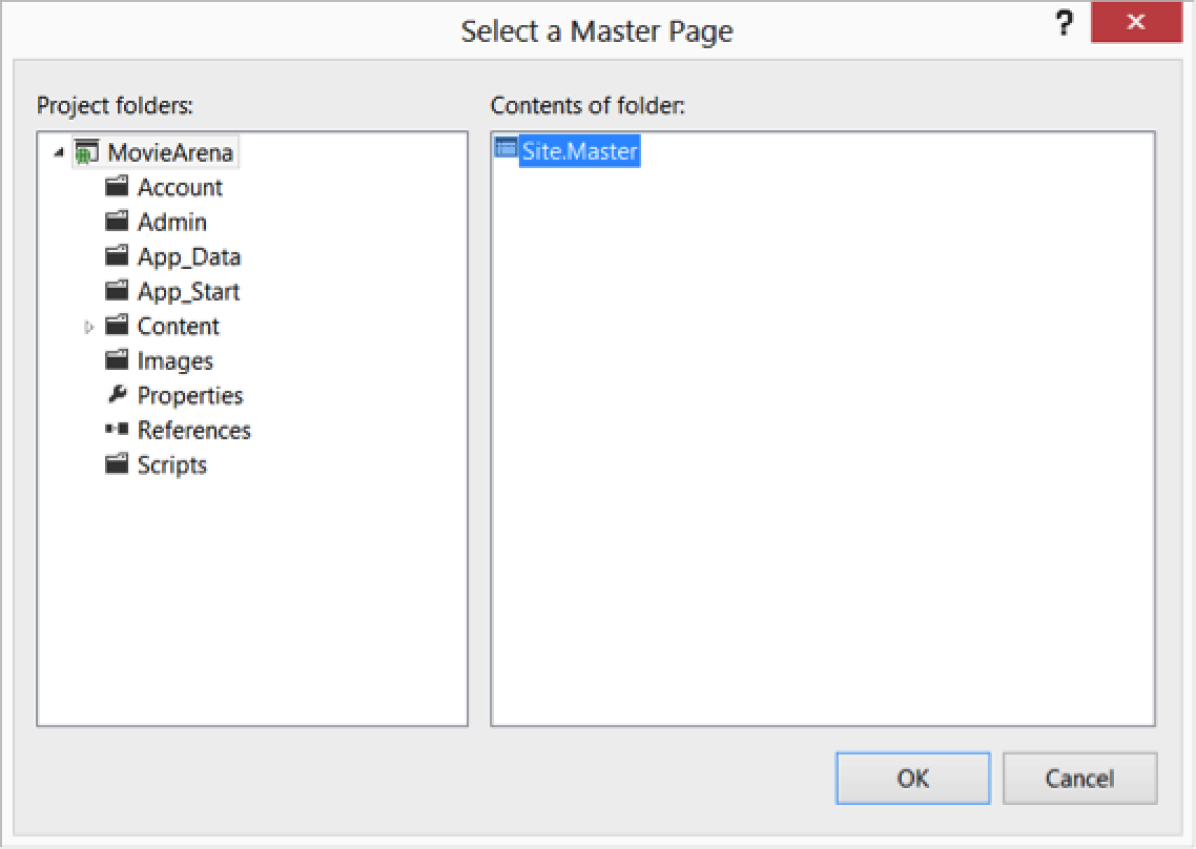
You will now have a popup window to select the type of item you want to add. I selected “Web Form using Master Page” instead of the simple “Web Form” (I will give you an explanation on that in a while). Rename it to “Home.aspx” and then hit “Add.”

Now another popup appears asking you to select a master page already existing in your application. I selected the “Site.Master” and then finally hit “OK.”
You will now see that a “Home.aspx” along with its code file “Home.aspx.cs” has been added under the web application main root and also the aspx file has been opened up for you to develop in. One more thing to do is to delete the default.aspx page that was added by Visual Studio and set the newly created home page as the start-up page by right-clicking the Home.aspx page and selecting the “Set as Start Page” option.
Your inner design structure. When working to display your page, ASP.NET merges the master page and all the inner content put in the content places defined in the page to display and renders it as a whole in front of you while keeping all functionality intact. Neat, isn’t it? To learn more about master pages, their benefits and how they work, check out what Microsoft has to say:
http://msdn.microsoft.com/en-us/library/wtxbf3hh.aspx
Now we need to first look into and modify our already provided master page that ASP.NET set for us by default. So double-click the “Site.Master” residing in the root node of our web application in the bottom near “Web.Config.“
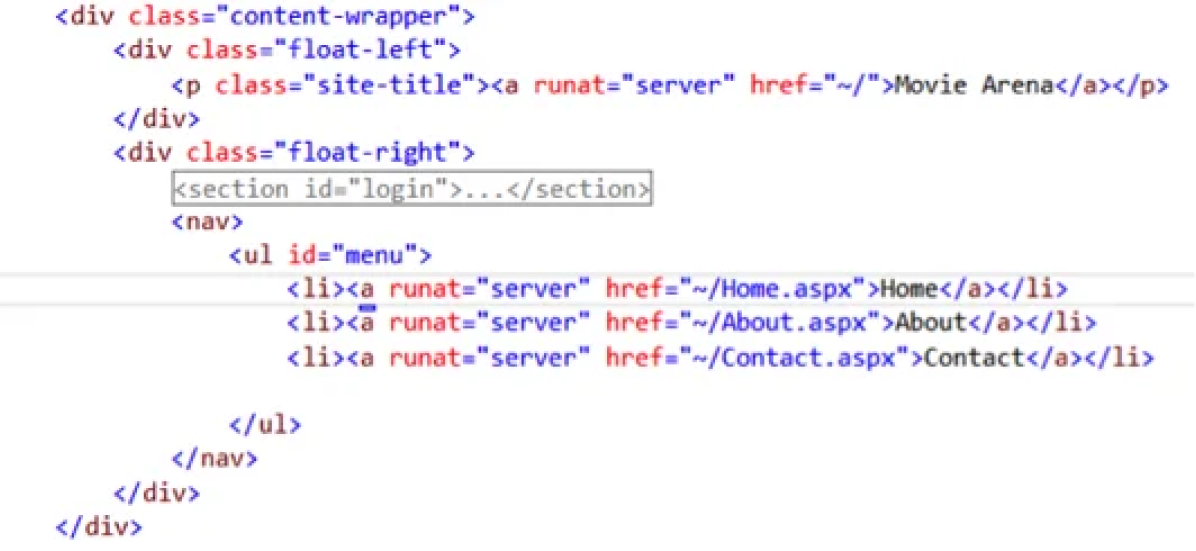
In the html of this master page, do the following:
1. Replace “your logo here” with “Movie Arena.”
2. Set the href property of the Home navigation ul menu to ~/Home.aspx.
You will note that this site has a setup login/register section already set up to add security to your web application using ASP.NET Membership and Role providers. There are some awesome ways to quickly add security options, like form authentication or windows authentication, into your web application. This allows you to manage users and roles for authenticated access with ease. If you are interested in learning more about these, here is a good source:
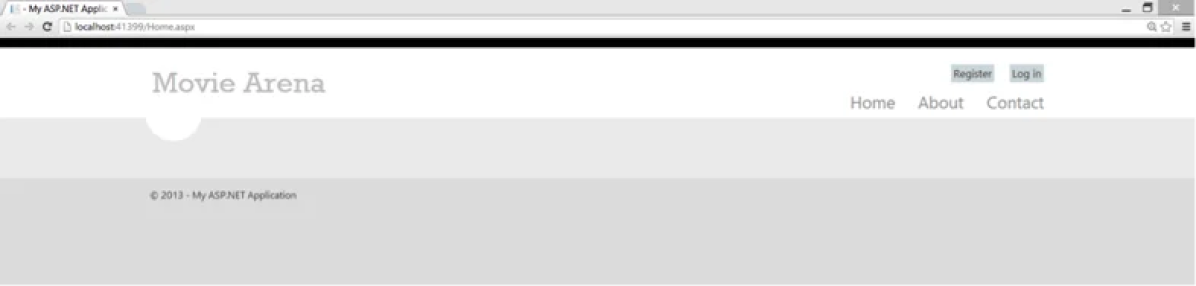
I have set the security in my application as forms authentication and created my super user (my user login info is username: “superadmin” and password: “sa12345”). “Save All” and run your application by hitting “F5” (shortcut for the play icon in the top toolbar). The home page will open up and you will see that the logo text has changed and you now have set the Home navigation option in the top right menu to link to the Home.aspx page to ease navigation back to it if you browse any other page.
Now let’s set this page to manage our movie listings in the database so that we can start adding, modifying and deleting them.
Open the Home.aspx page. We will put our movie listing html code In the Content tag named “Content3” as shown below in the code. This will place our code in the main area below the menu navigation. So add the following code in the Home.aspx file:
Page Title=“” Language=“C#” MasterPageFile=“~/Site.Master” AutoEventWireup=“true” CodeBehind=“Home.aspx.cs” Inherits=“MovieArena.Home” %>
<asp:Content ID=”Content1″ ContentPlaceHolderID=”HeadContent” runat=”server”>
asp:Content>
<asp:Content ID=”Content2″ ContentPlaceHolderID=”FeaturedContent” runat=”server”>
asp:Content>
<asp:Content ID=”Content3″ ContentPlaceHolderID=”MainContent” runat=”server”>
<asp:LinkButton ID=”btnAddNewMovie” runat=”server” Text=”Add New Movie” OnClick=”btnAddNewMovie_Click”>asp:LinkButton>
<asp:GridView ID=”gvMovies” runat=”server” AutoGenerateColumns=”False” AutoGenerateDeleteButton=”True” AutoGenerateEditButton=”True” CellPadding=”4″ DataKeyNames=”Id” DataSourceID=”MovieArenaDataSource” EmptyDataText=”No Movies Found!” ForeColor=”#333333″ GridLines=”None” Width=”100%”>
<AlternatingRowStyle BackColor=”White” ForeColor=”#284775″ />
<Columns>
<asp:BoundField DataField=”Id” HeaderText=”Id” InsertVisible=”False” ReadOnly=”True” SortExpression=”Id” Visible=”False” />
<asp:BoundField DataField=”Name” HeaderText=”Movie Name” SortExpression=”Name” />
<asp:BoundField DataField=”Director” HeaderText=”Director” SortExpression=”Director” />
<asp:BoundField ApplyFormatInEditMode=”True” DataField=”ReleaseDate” DataFormatString=”{0:dd MMM yyyy} ” HeaderText=”Release Date” SortExpression=”ReleaseDate” />
Columns>
<EditRowStyle BackColor=”#999999″ />
<FooterStyle BackColor=”#5D7B9D” Font-Bold=”True” ForeColor=”White” />
<HeaderStyle BackColor=”#5D7B9D” Font-Bold=”True” ForeColor=”White” />
<PagerStyle BackColor=”#284775″ ForeColor=”White” HorizontalAlign=”Center” />
<RowStyle BackColor=”#F7F6F3″ ForeColor=”#333333″ />
<SelectedRowStyle BackColor=”#E2DED6″ Font-Bold=”True” ForeColor=”#333333″ />
<SortedAscendingCellStyle BackColor=”#E9E7E2″ />
<SortedAscendingHeaderStyle BackColor=”#506C8C” />
<SortedDescendingCellStyle BackColor=”#FFFDF8″ />
<SortedDescendingHeaderStyle BackColor=”#6F8DAE” />
asp:GridView>
<asp:SqlDataSource ID=”MovieArenaDataSource” runat=”server” ConnectionString=”Data Source=NazTee-LTSQLServer2012;Initial Catalog=MovieArenaDB;User ID=maadmin;Password=maadmin123″ DeleteCommand=”DeleteMovie” DeleteCommandType=”StoredProcedure” InsertCommand=”InsertMovie” InsertCommandType=”StoredProcedure” ProviderName=”System.Data.SqlClient” SelectCommand=”GetAllMovies” SelectCommandType=”StoredProcedure” UpdateCommand=”UpdateMovie” UpdateCommandType=”StoredProcedure” ConflictDetection=”OverwriteChanges”>
<DeleteParameters>
<asp:Parameter Name=”Id” Type=”Int32″ />
DeleteParameters>
<InsertParameters>
<asp:ControlParameter ControlID=”txtMovie” Name=”Name” PropertyName=”Text” Type=”String” />
<asp:ControlParameter ControlID=”txtDirector” Name=”Director” PropertyName=”Text” Type=”String” />
<asp:ControlParameter ControlID=”txtReleaseDate” Name=”ReleaseDate” PropertyName=”Text” Type=”String” />
InsertParameters>
<UpdateParameters>
<asp:Parameter Name=”Id” Type=”Int32″ />
<asp:Parameter Name=”Name” Type=”String” />
<asp:Parameter Name=”Director” Type=”String” />
<asp:Parameter Name=”ReleaseDate” Type=”DateTime” />
UpdateParameters>
asp:SqlDataSource><asp:Panel ID=”pnlAddMovie” runat=”server” Width=”100%”>
<div style=”float:left;”>
<div style=”text-align:left;”>Movie Name:div> <div style=”text-align:left;”><asp:TextBox ID=”txtMovie” runat=”server”>asp:TextBox>div> <br />
<div style=”text-align:left;”>Movie Director:div> <div style=”text-align:left;”><asp:TextBox ID=”txtDirector” runat=”server”>asp:TextBox>div> <br />
<div style=”text-align:left;”>Movie Release Date:div> <div style=”text-align:left;”><asp:TextBox ID=”txtReleaseDate” runat=”server”>asp:TextBox>div> <br />
<br /><br />
<asp:Button ID=”btnSaveMovie” runat=”server” Text=”Save Movie” OnClick=”btnSaveMovie_Click” />
div>
asp:Panel>
asp:Content>And the following c# code in the code behind file.void Page_Load(object sender, EventArgs e)
{
if (!IsPostBack)
{
if (HttpContext.Current.User.Identity.IsAuthenticated)
{
// Show Add/Edit and Delete Options
btnAddNewMovie.Visible = true;
gvMovies.AutoGenerateEditButton = true;
gvMovies.AutoGenerateDeleteButton = true;
}
else
{
//Only Show Movie Info
btnAddNewMovie.Visible = false;
gvMovies.AutoGenerateEditButton = false;
gvMovies.AutoGenerateDeleteButton = false;
}
gvMovies.Visible = true;
pnlAddMovie.Visible = false;
gvMovies.DataBind();
}
}
As you can see, I put an ASP LinkButton, an ASP Gridview, an ASP SQLDataSource and then an ASP Panel Control in the page, in that order. The link button named “Add New Movie” will be used to toggle between the Gridview that displays the movies and helps us edit or delete movies and the panel which helps us add a new movie into our database by using 3 ASP textbox controls and 1 ASP button control to save and show it on the grid when done.
The Gridview is populated using the SQLDataSource Control that helps us select the connection string that we set in our web.config for our ASP.NET membership and role provider setup. Then we select stored procedures as our option to manage that SQLDataSource and tie the appropriate Insert/Update/Delete/Select stored procedures to its corresponding commands.
To do this, follow the procedure below:
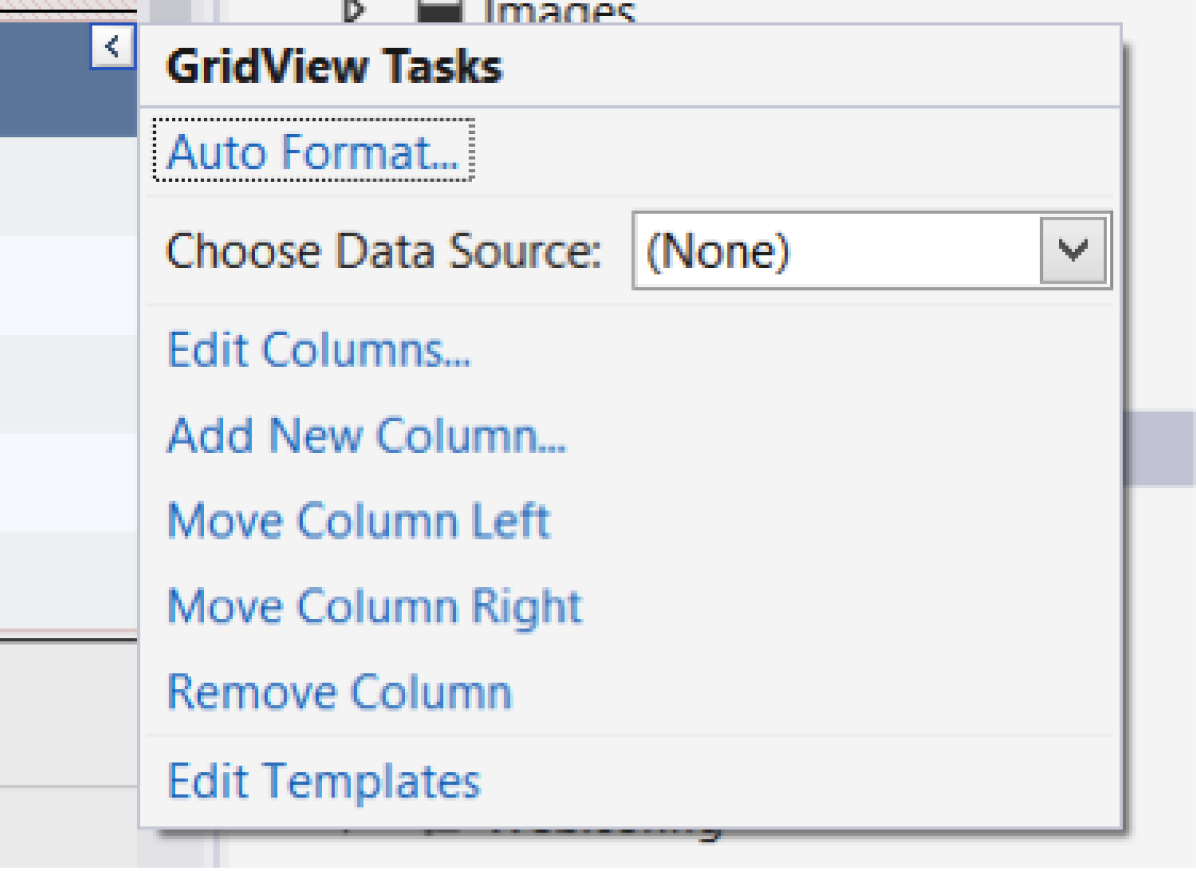
Go to design mode of your Home.aspx file. Select GridView Extended option. Select “New Data Source” from the Choose Data Source Dropdown.
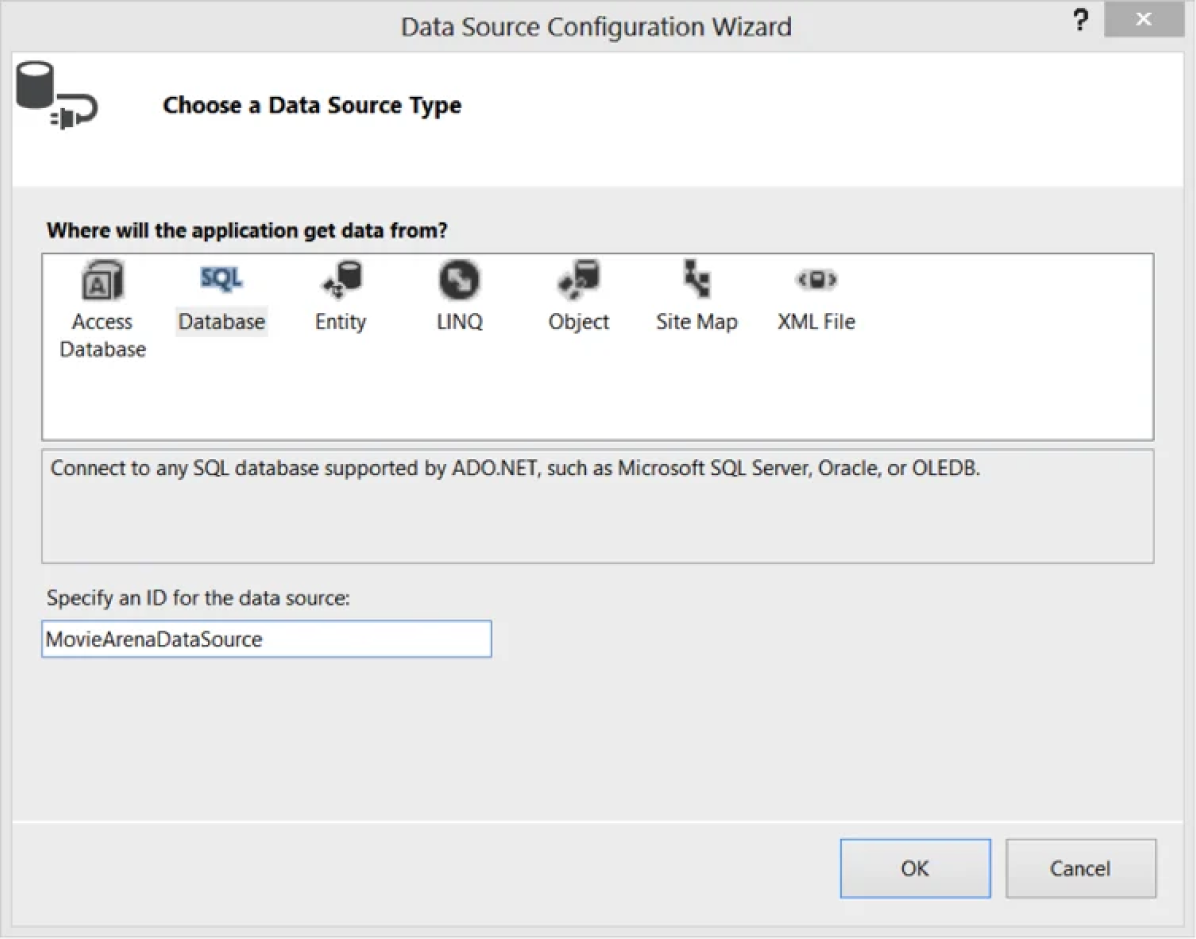
In the next window, Select “Database” and then put the name “MovieArenaDataSource” and hit “OK.”
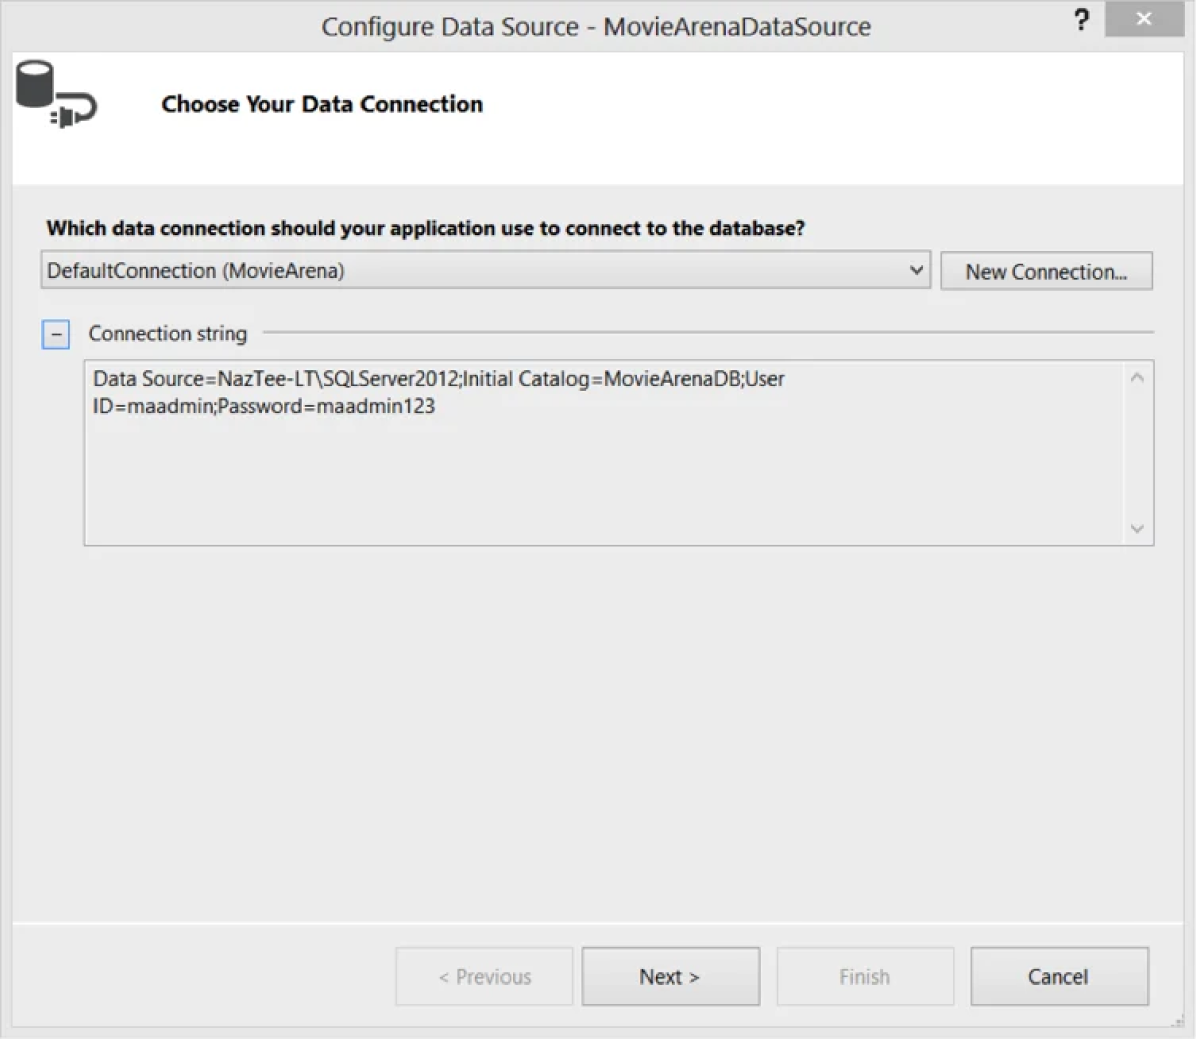
Select the Connection String from the dropdown showing the name of the database, as shown in the figure below. Hit “Next.”
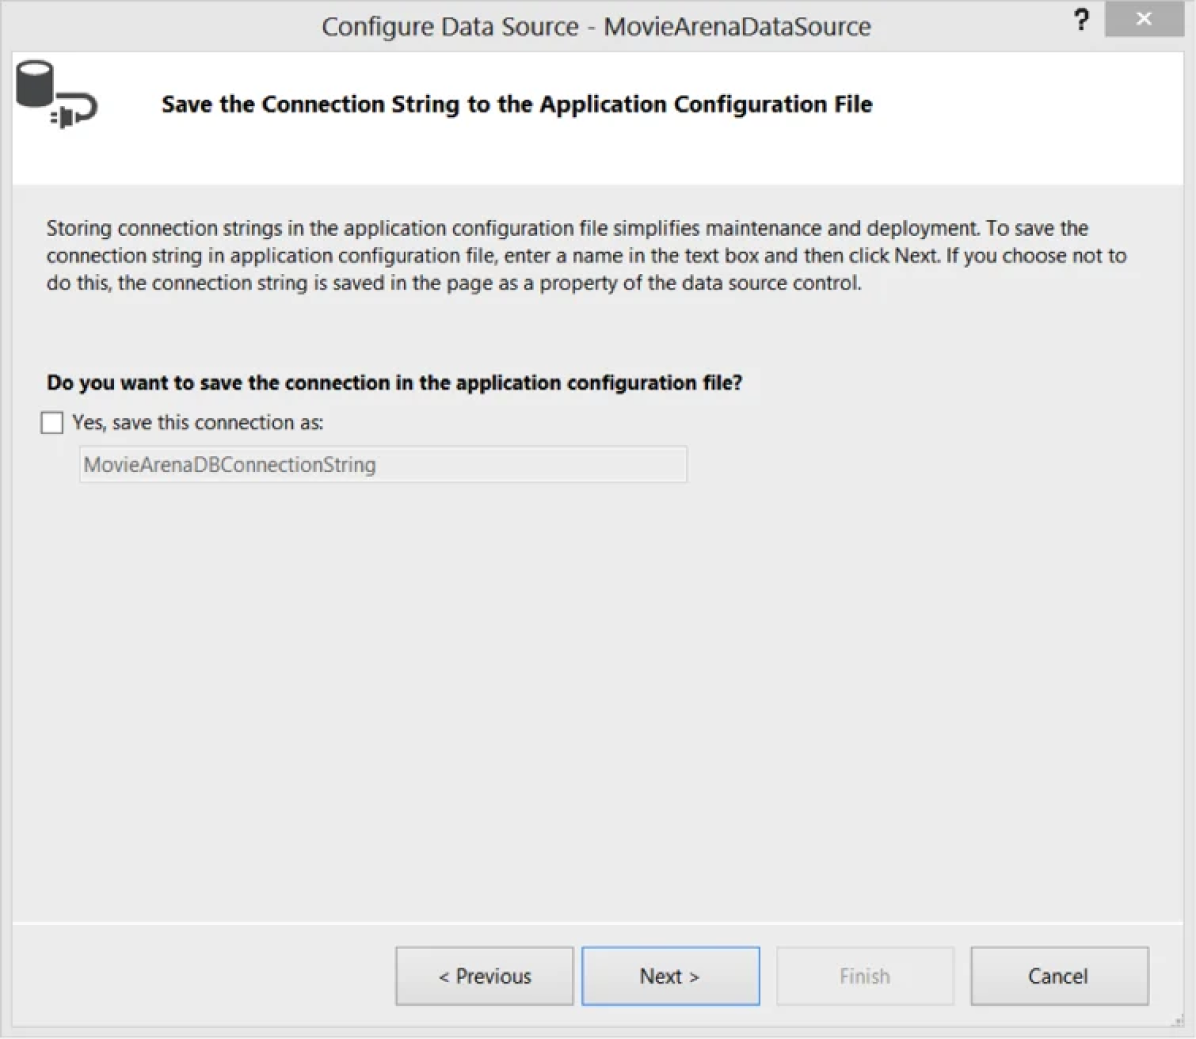
Uncheck the “Yes, save this connection as” checkbox. Hit “Next.”
Now for all tabs (i.e. Select/Update/Insert/Delete), select the “Store Procedure” radio button and select the appropriate one from the dropdown already filled with your added Stored Procedures. Hit “Next.”
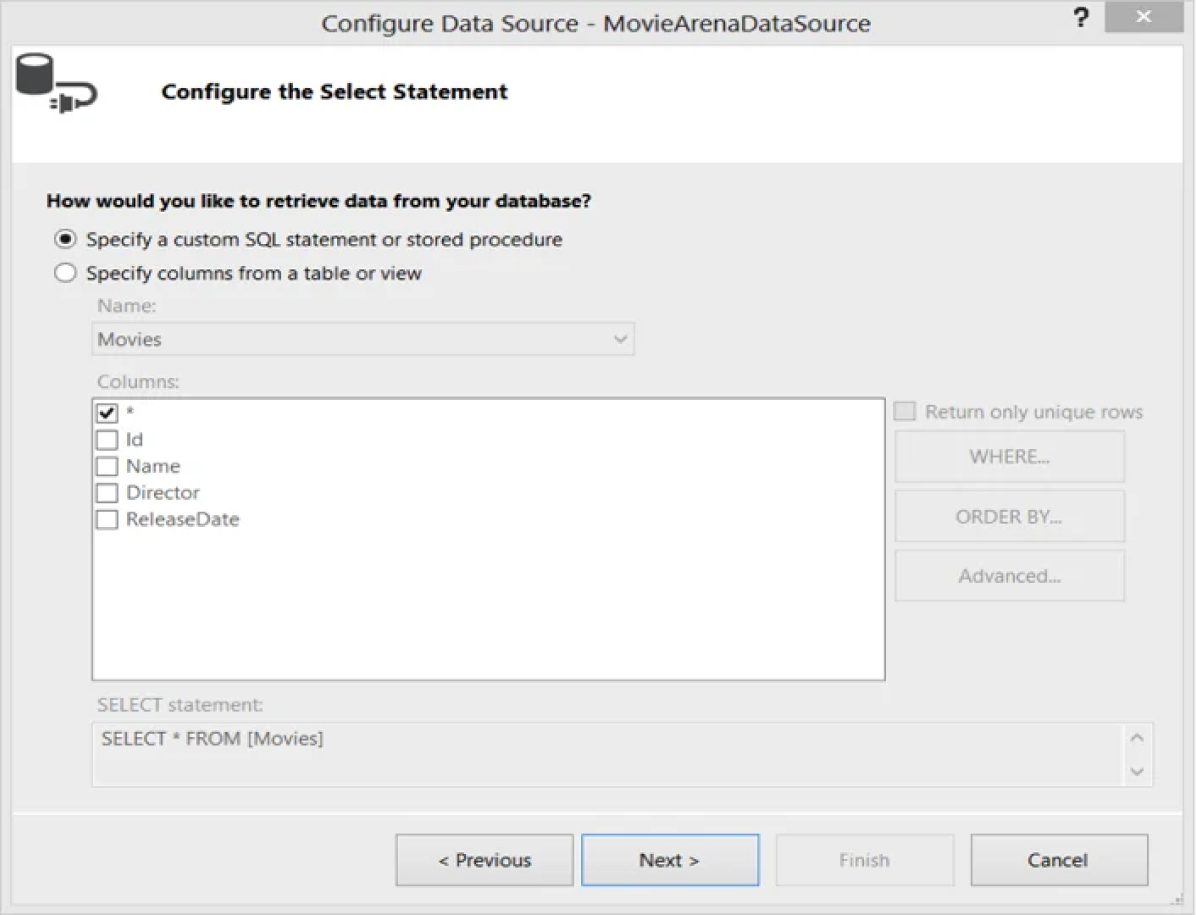
Test your select query by clicking “Test Query.” If all works well then hit “Finish” and voila, all set.
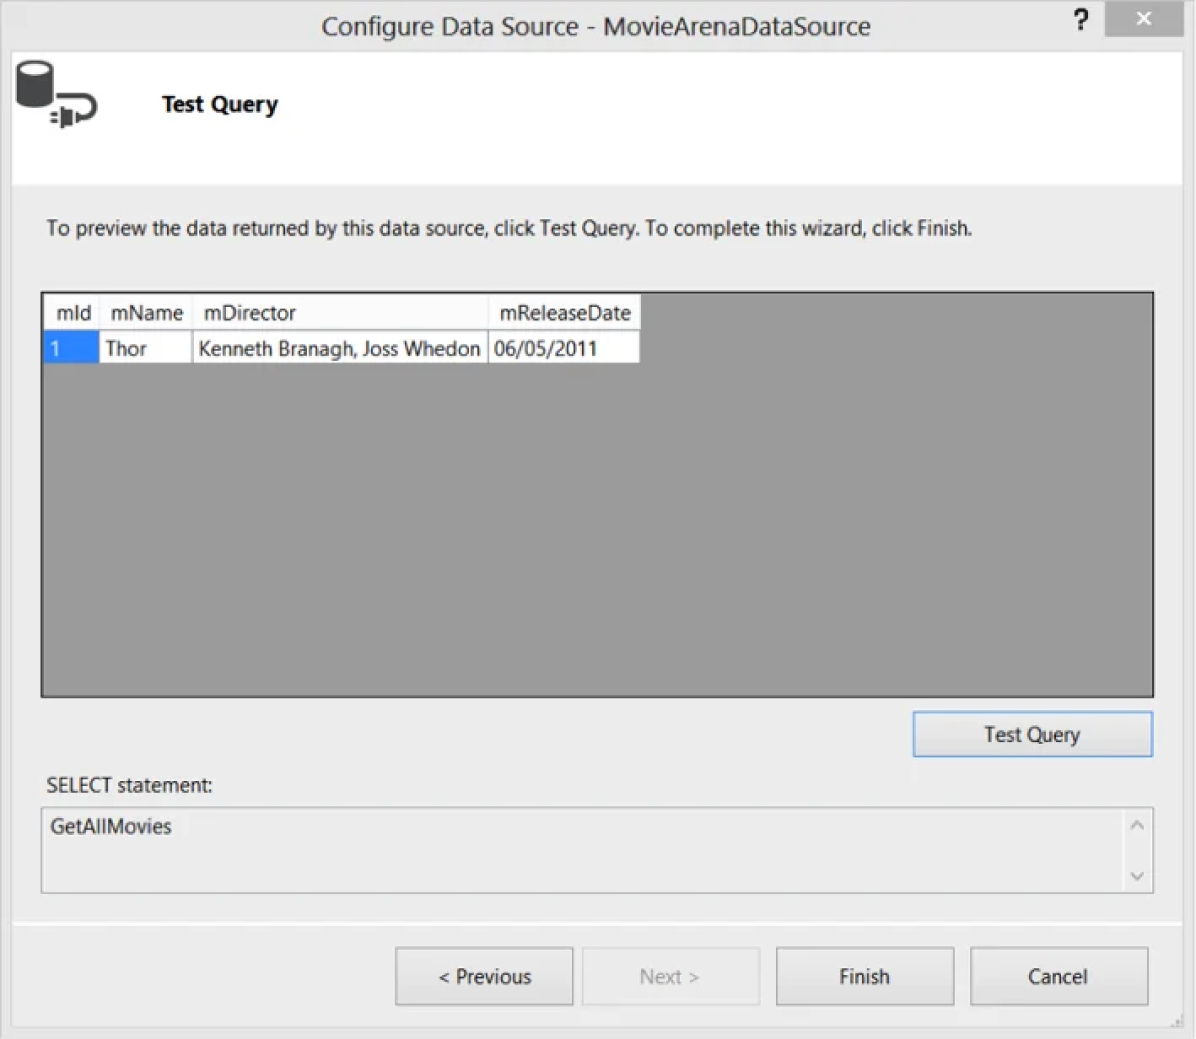
Note that I pre-populated the table with one record just to see if the data source was retrieving the data correctly.
With that all set, I created a panel with 3 Text boxes to get movie name, director and release date from the user and a Save Movie button to hit to add a new movie into the database. On the aspx side, I modified the Insert Parameters of our SQLDataSource so that they get their value from those 3 textbox controls instead of getting them from the Gridview (review aspx html code of Home.aspx shown a few steps back).
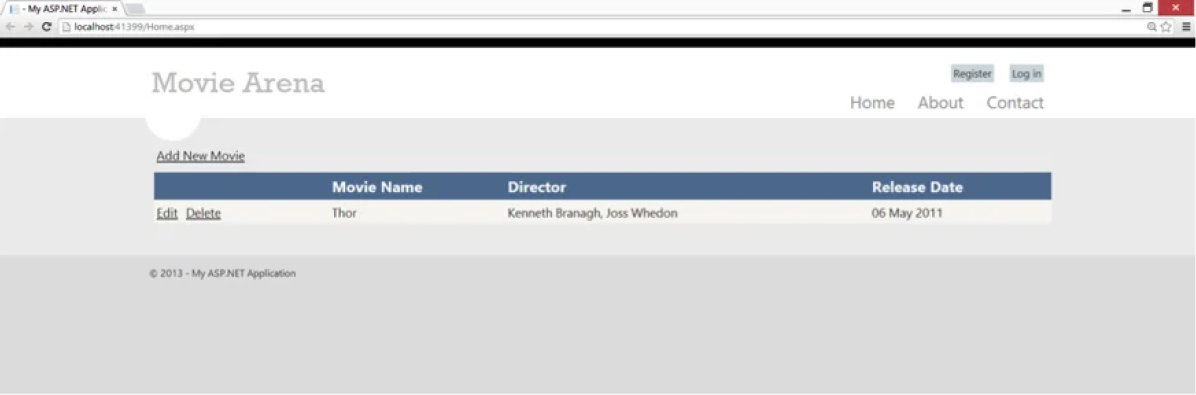
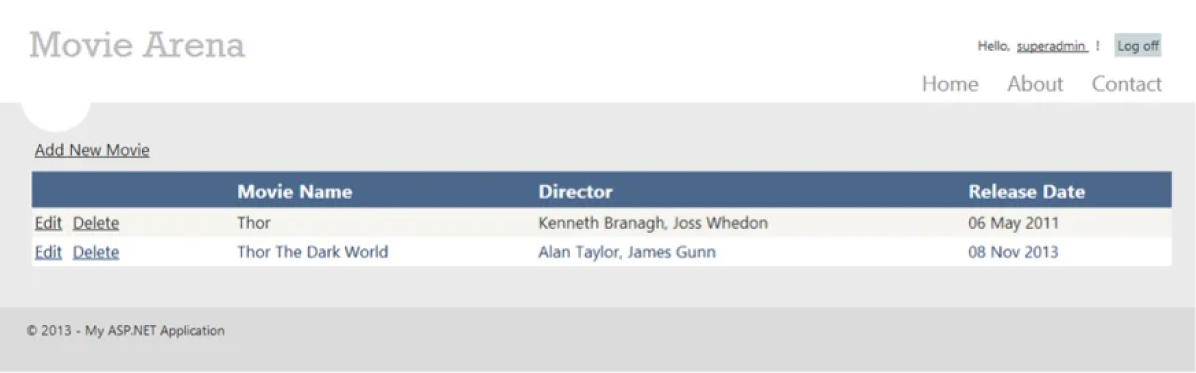
Now let’s go over the code I added in the code-behind file. You will see that in the Page_Load Event, I added a check to see the web page’s postback state. If it was not in the postback state then it would make the Movie Listing GridView and the Add New Movie Button visible on the page when it’s loaded the first time by a user. Save and Run your portal. You will be able to see the following page.
On the Add New Movie click event, I added code to hide the Gridview as well as the “Add New Movie” link and made the Panel show so that the user can add a new movie into the database and the listing. I filled the textboxes with another movie’s info, as shown below.
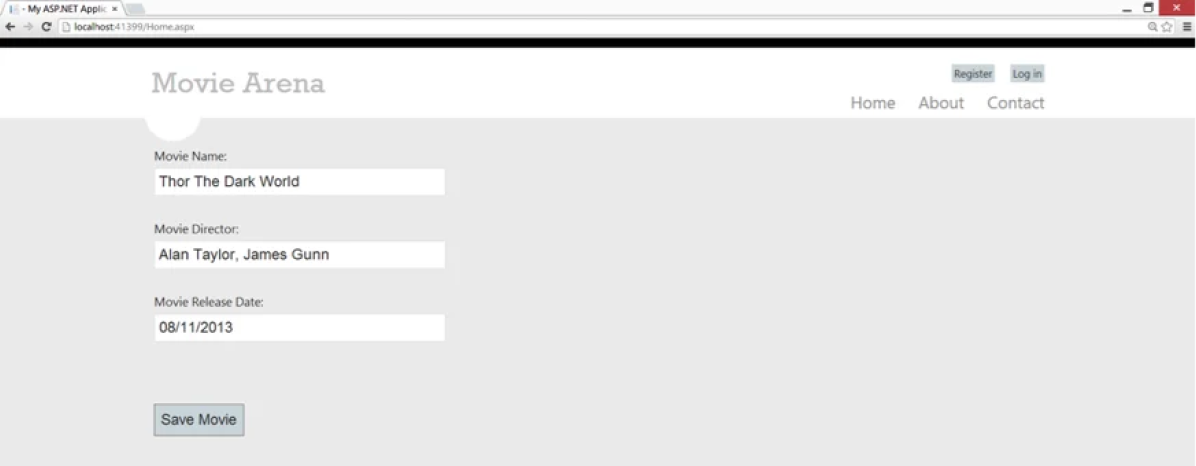
I then hit the “Save Movie” button to save it and re-populate the grid to show me the new entry.

As you can see, our insert functionality worked perfectly.
But wait! Oh no, I added the wrong release date for our new entry. Well fear not, as we have already setup the edit functionality. So I will click the “Edit” link button for the record I want to edit, correct the release date and hit the “Update” link button. The correct date shows up in the same location after hitting the edit button. Observe!
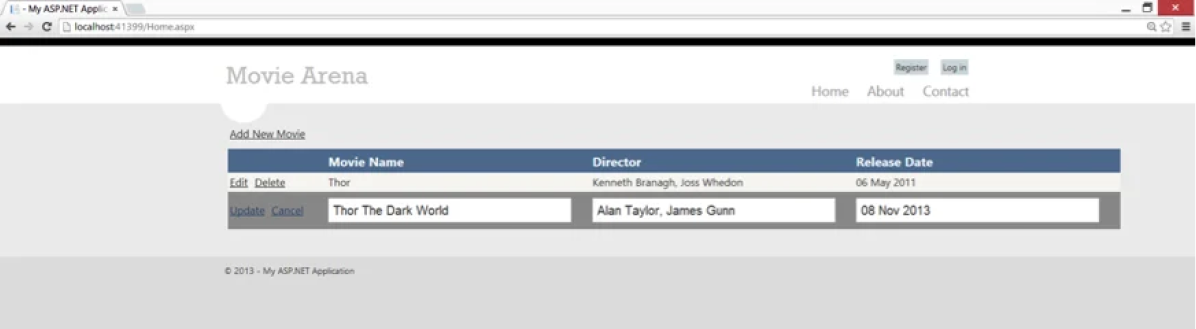
After hitting the “Update” button, we now have the correct entry showing in our list. You can also test our delete functionality by hitting the “Delete” link against the record and you will see that our SQLDataSource is already setup for the delete feature and it deletes the record from the database.
Cool, isn’t it?
Now finally I will do some changes in the code so that the edit, delete and add functionality is only available when our previously created super user logs in. Do the following change in the Page_Load Event in the code behind file:
protected void Page_Load(object sender, EventArgs e)
{
if (!IsPostBack)
{
if (HttpContext.Current.User.Identity.IsAuthenticated)
{
// Show Add/Edit and Delete Options
btnAddNewMovie.Visible = true;
gvMovies.AutoGenerateEditButton = true;
gvMovies.AutoGenerateDeleteButton = true;
}
else
{
//Only Show Movie Info
btnAddNewMovie.Visible = false;
gvMovies.AutoGenerateEditButton = false;
gvMovies.AutoGenerateDeleteButton = false;
}
gvMovies.Visible = true;
pnlAddMovie.Visible = false;
gvMovies.DataBind();
}
}
Set the defaultURL attribute to the Home.aspx page in the web.config file. Set the LogoutPageURL property also to Home.aspx in the Site.Master <asp:LoginStatus… tag. Now Save and Run the web application.
You will see that the “Add New Movie,” “Edit” and “Delete” options have vanished and you can only view the listings. In order to see and use these features, you will click the “Login” link in the top right corner of the page which will redirect you to the default login page already set by Visual Studio when we first created this Web Forms application.

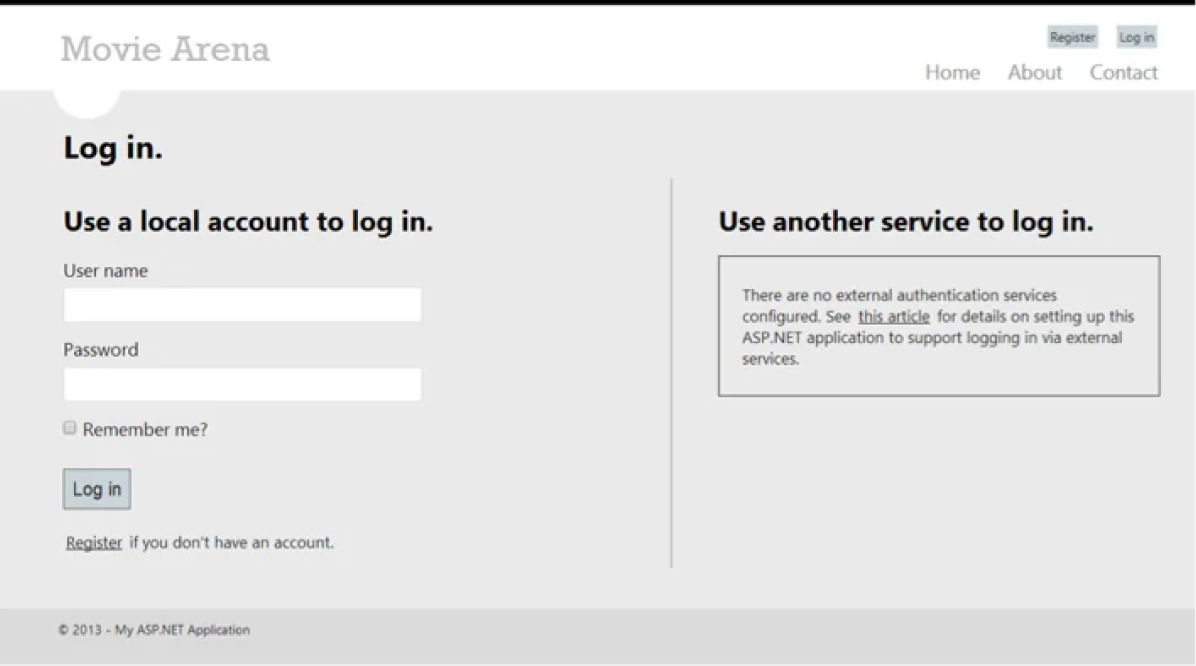
Log in with the provided super user credentials I gave earlier or whatever you set for yourself. After logging in, you will see that the same “Login” link in the top right corner has changed automatically to a “Logoff” link once you have been redirected back to the Home page. The “Add,” “Edit” and “Delete” functionalities will also be visible and ready for use.
That brings us to the end of this practical demonstration of, ASP.NET Web Forms, a powerful technology that is widely used today. You can download the code and database backup file from the following link.
ASP.NET Web Forms – MovieArena Solution + Database
Summary
ASP.NET Web Forms is an awesome tool for developing web applications. You saw me use its power and the IDE’s power in developing the MovieArena portal. It provides us with such great ready to use controls which we can easily deploy without having to manually write too much html code and with very little code in the code-behind file to be integrated into our web application pages. By the way, you have the ability to do this all manually for more customization if you want. Even after so many years since its birth, it’s still considered to be the mostly widely used technology for developing .NET Web Applications and still is being upgraded from time to time with new features. I am a big fan of ASP.NET Web Forms and always will be.
It is such a widely-known technology that I am far from the first to write about it. Just Google ASP.NET Web Forms and you will be blasted with great articles and tutorials to learn more (Although I hope you won’t need to after reading my blog and learning most of the stuff on your own!!!). But still if you really want to go in depth then I suggest you go to http://www.ASP.NET/web-forms and hit it hard for more learning.
With that, I finish this second blog in my series of blogs and hope that this helps a lot of young and energetic software developers in their quest to learn .NET Web technologies and carries them forward in their careers. I will be seeing you all in my next blog with yet another big ASP.NET Technology known as “ASP.NET MVC.” So stay connected and keep a lookout for the next blog. Take Care everyone.

.svg)
.svg)
.svg)
